You’ve taken the perfect product photo. The lighting is right, the angle is great, the item looks exactly as it should. But behind it sits a cluttered kitchen counter, a wrinkled bedsheet, or a shadow that won’t cooperate. The product is ready. The background isn’t.
Or you’re putting together a presentation and need a clean headshot — just the person, no office lobby, no bookshelf, no random coworker walking by in the background. You have the photo. You just need to isolate the subject.
Or you’re building a website, designing a flyer, assembling a social media post, creating a composite image — and the asset you need has a background that doesn’t belong. You don’t need what’s behind the subject. You need the subject alone, on a transparent background, ready to drop into any design.
This used to require Photoshop, a steady hand with the pen tool, and anywhere from five minutes to an hour of careful edge selection. Hair was a nightmare. Semi-transparent objects were nearly impossible. And if you weren’t trained in image editing, you either paid someone or lived with the background.
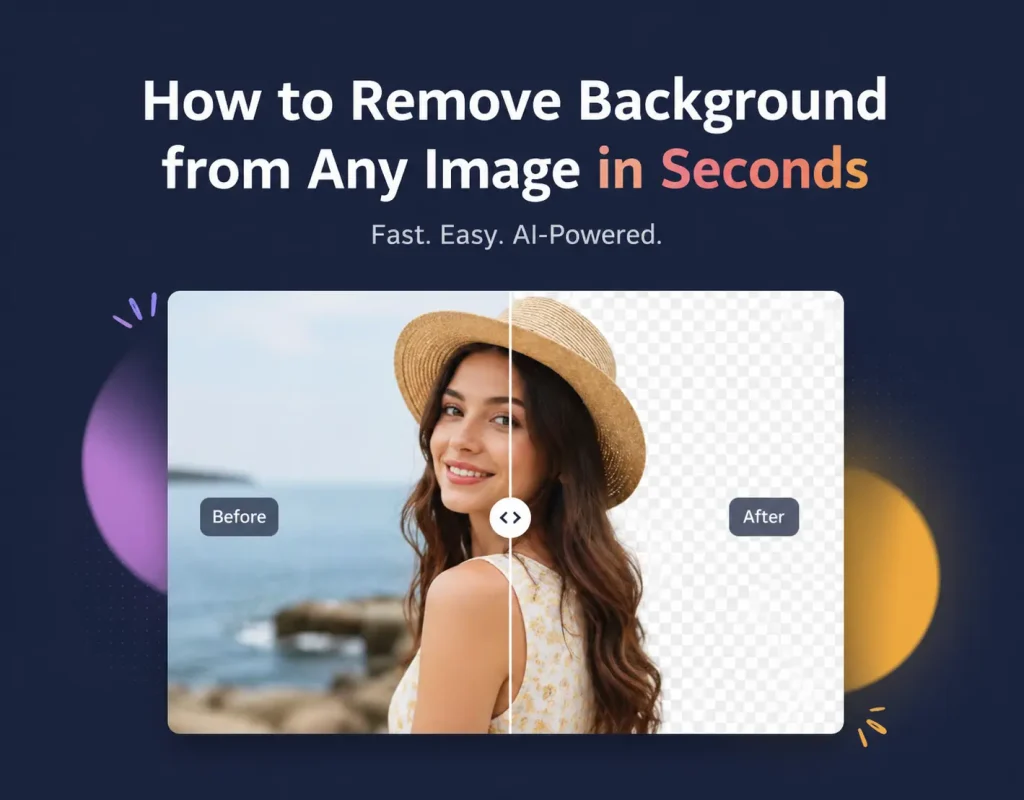
That’s no longer the case. AI-powered background removal tools can now detect the subject of an image — person, product, animal, object — and separate it from the background in seconds, with edge accuracy that rivals manual selection.
RGBKit’s Remove Background tool does exactly this. Upload any image, and the AI identifies the subject, removes the background, and delivers a clean transparent PNG — free, in your browser, no account required.
This guide covers how background removal works, when you need it, how to get the best results, and what to do with the image once the background is gone.
How AI Background Removal Works
Traditional background removal was a manual process. You traced around the subject using selection tools — the pen tool, magic wand, lasso, or quick selection — and then deleted everything outside the selection. The quality depended entirely on the skill of the person doing the tracing. Complex edges like hair, fur, lace, or transparent objects required advanced techniques like channel masking or refine edge brushes.
AI background removal replaces all of this with a trained neural network that has learned — from millions of images — what constitutes a “subject” and what constitutes a “background.” When you upload a photo, the AI analyzes the image, identifies the foreground subject, generates a precise mask around it, and removes everything else.
The result is a PNG file with a transparent background — meaning the areas where the background used to be are now empty. You can place this image on any colored background, any design, any surface, and it blends naturally.
What the AI handles well
-
People — full body, headshots, group photos, even complex hair and clothing
-
Products — items on tables, shelves, or studio setups
-
Animals — pets, wildlife, even subjects with fur or feathers
-
Objects — electronics, furniture, food, vehicles, plants
-
Logos and graphics — shapes with clean or complex edges
Where edges get tricky
No tool is perfect on every image. Background removal AI can struggle with:
-
Subjects that blend into the background — a white product on a white surface, or a dark animal against a dark background
-
Extremely fine detail — individual strands of flyaway hair, thin wires, or delicate mesh
-
Semi-transparent objects — glass, smoke, sheer fabric
-
Multiple overlapping subjects — when it’s ambiguous which element is the “main” subject
In these cases, the AI still gets you 90% of the way there. Minor cleanup — if needed at all — takes seconds rather than the minutes or hours that full manual selection would require.
When You Need Background Removal
Background removal isn’t a niche technique for graphic designers. It’s a practical tool for anyone who works with images.
E-commerce and product photography
Online marketplaces — Amazon, Shopify, Etsy, eBay — have specific requirements for product images. Amazon, for example, requires a pure white background for main product images. Many other platforms recommend clean, distraction-free backgrounds to keep the focus on the item being sold.
Shooting every product on a perfect white seamless backdrop isn’t always practical. Background removal lets you photograph products in any environment and then isolate them cleanly for your listings. One shoot, unlimited backgrounds.
Social media content
Clean cutouts make social media graphics more dynamic. Instead of posting a flat photo, you can place a subject on a branded background, add text behind and in front of the subject, create layered compositions, or match the aesthetic of a campaign.
Content creators, influencers, and social media managers use background removal constantly to produce scroll-stopping visuals without a full design team.
Presentations and documents
A headshot with a distracting background looks unprofessional in a pitch deck. A product photo with a messy background undermines a sales presentation. Removing the background and placing the subject on a clean slide or document instantly elevates the professionalism of your materials.
Website and app design
Designers need transparent assets all the time — for hero images, feature sections, app interfaces, marketing pages, and email templates. Background removal turns any photograph into a design-ready asset that composites cleanly over any layout.
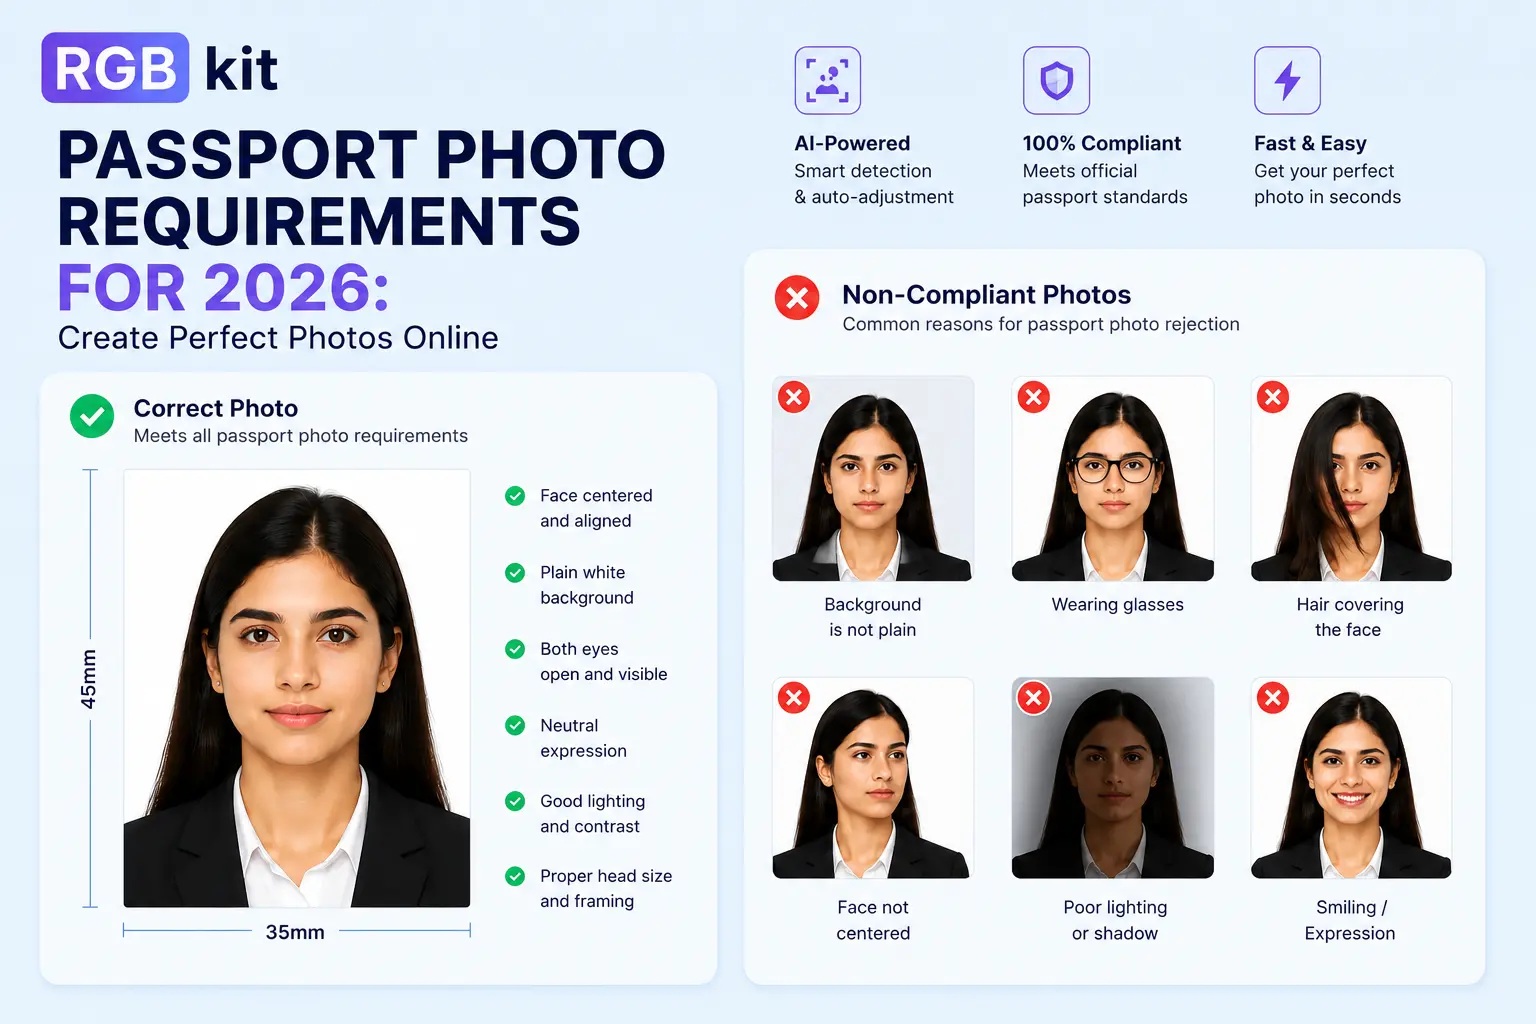
ID photos, passports, and official documents
Many official documents require photos with a solid white or light-colored background. Instead of finding a suitable wall to stand in front of, you can take a photo anywhere and remove the background afterward. (RGBKit also offers a dedicated Passport Photo Maker for this specific use case.)
Print-on-demand and merchandise
If you’re selling custom merchandise — t-shirts, mugs, phone cases, stickers — you need clean, isolated graphics. Background removal turns any image into a print-ready design that can be placed on any product mockup.
Real estate and interior design
Real estate agents use background removal to swap dull skies for blue ones, isolate furniture for staging mockups, or create clean property graphics. Interior designers isolate furniture and decor items from catalog photos to create mood boards and room visualizations.
Personal projects
Family photo collages, invitations, greeting cards, scrapbooks, social media profiles — background removal makes it easy to extract people and subjects from any photo and place them in any creative context.
How to Remove Background from Any Image — Step by Step
-
Upload your image — drag and drop or click to browse. Supports JPG, PNG, and WebP.
-
Wait a few seconds — the AI processes the image and removes the background automatically
-
Preview the result — check the transparent cutout against different backgrounds
-
Download the transparent PNG — save the image with the background removed
The entire process happens in your browser. No software to install, no account to create, no watermark on the output.
Getting the Best Results
The AI does the heavy lifting, but the quality of your input image directly affects the quality of the output. Here’s how to set yourself up for a clean removal.
Start with good contrast
The more your subject stands out from the background, the easier it is for the AI to draw a precise boundary. A person in a red shirt against a blue wall will produce a cleaner cutout than the same person in a gray shirt against a gray wall.
If you control the shooting environment, choose a background that contrasts with your subject. This doesn’t mean you need a studio — even a solid-colored wall or a bedsheet in a contrasting color helps significantly.
Use well-lit images
Shadows, underexposure, and harsh lighting create ambiguity at the edges where the subject meets the background. Even, diffused lighting — natural window light or a softbox — produces the cleanest edges for background removal.
Avoid flash that creates hard shadows behind the subject, as these can be interpreted as part of the subject’s outline.
Keep the subject in focus
A blurry subject has soft, undefined edges that make it harder for the AI to determine where the subject ends and the background begins. Make sure your subject is sharply focused, especially around the edges.
Shoot at high resolution
Higher resolution means more pixel data at the edges, which gives the AI more information to work with. A 4000×3000 pixel image will produce cleaner edge detail than a 640×480 image. If you have the option, shoot at the highest resolution your camera allows.
Avoid busy, overlapping backgrounds
A background with many elements that overlap with the subject — tree branches framing a person’s head, a patterned wallpaper that matches the subject’s clothing — makes edge detection harder. When possible, use a cleaner background to begin with.
What to Do After Removing the Background
A transparent PNG is a starting point, not always the final product. Here’s what comes next.
Place on a solid color
The most common next step is dropping the subject onto a clean background. White for product listings. A brand color for marketing materials. A gradient for social media graphics.
RGBKit’s Change Background Color tool lets you replace the transparent background with any solid color, or use the White Background tool for a one-click white backdrop — perfect for marketplace listings.
Composite into a design
Drop the transparent cutout into Canva, Figma, PowerPoint, Google Slides, or any design tool. Because the background is transparent, the subject blends naturally with whatever layout you place it in.
Blur the original background instead
Sometimes you don’t want to remove the background entirely — you just want to soften it. A blurred background (the “bokeh” effect) keeps the context of the original photo while drawing attention to the subject. RGBKit’s Blur Background tool does this without removing anything.
Resize for your platform
After removing the background, you may need to resize the image for a specific use case — an Instagram post, a website banner, a product thumbnail. Use RGBKit’s Resize Image tool to scale the cutout to your target dimensions.
Add a watermark
If you’re sharing the edited image publicly — as a portfolio piece, a client preview, or a product listing you want to protect — add a watermark to establish ownership. RGBKit’s Watermark Image tool overlays your logo or text on the image.
Crop to fit
Once the background is gone, you might find the image has excess transparent space around the subject. Use RGBKit’s Crop Image tool to trim the image down to just the subject.
Background Removal vs. Other Techniques
Background removal is one of several ways to deal with an unwanted background. Understanding the differences helps you choose the right approach.
Removal vs. Cropping
Cropping cuts the image to a smaller rectangle. It can eliminate some background, but it removes parts of the image equally on all sides. You can’t crop out a background behind a person without also cropping parts of the person.
Background removal isolates the subject regardless of shape. It follows the subject’s contours, not a rectangular boundary.
Use cropping when: you need to trim the edges or change the aspect ratio. Use background removal when: you need to isolate the subject from what’s behind it.
Removal vs. Blurring
Blurring keeps the background but defocuses it, creating a depth-of-field effect. The subject stays sharp; the background becomes soft and undistracting.
Background removal eliminates the background entirely, leaving a transparent (or replaced) area.
Use blurring when: you want context (a person in an office, a product on a table) but want the focus on the subject. Use removal when: you need a clean cutout with no background at all.
Removal vs. Color replacement
Color replacement swaps the background for a specific solid color without creating transparency. It’s a two-step process: remove the background, then fill with a new color.
Use color replacement when: you know the final background color (white for Amazon, blue for a design). Use removal when: you need a transparent PNG that can be placed on any background later.
Common Use Cases by Industry
|
Industry |
Use Case |
Why Background Removal Matters |
|---|---|---|
|
E-commerce |
Product listings |
Marketplace requirements, clean presentation, consistent catalog |
|
Photography |
Portrait editing |
Isolate subjects for composites, albums, and client deliverables |
|
Marketing |
Ad creatives, social posts |
Dynamic compositions, branded backgrounds, eye-catching visuals |
|
Real estate |
Property listings |
Sky replacement, staging mockups, clean property graphics |
|
Education |
Course materials, presentations |
Professional visuals without design team overhead |
|
HR / Corporate |
Team pages, org charts |
Consistent headshots on matching backgrounds |
|
Print-on-demand |
Merchandise design |
Clean graphics ready for printing on any product |
|
Personal |
Invitations, cards, social profiles |
Creative freedom with any photo |
Frequently Asked Questions
How do I remove the background from an image for free?
Go to RGBKit’s Remove Background tool, upload your image, and download the result. Free, no signup, no software.
What image formats are supported?
The tool accepts JPG, PNG, and WebP files. The output is always a PNG with a transparent background.
Will the output have a watermark?
No. The downloaded image is clean — no watermarks, no branding, no restrictions.
Can I remove the background from multiple images?
You can process images one at a time. For batch processing, upload each image separately and download the results individually.
How accurate is the AI at detecting edges?
Very accurate for most subjects. People, products, animals, and objects with clear edges are handled cleanly. Complex edges like fine hair strands or semi-transparent materials may need minor touchup in a separate editor, but the AI provides a strong starting point.
Can I use this on my phone?
Yes. The tool runs entirely in your browser and works on any mobile device — iPhone, Android, or tablet. Upload, process, and download directly from your phone.
What if the AI removes part of the subject?
This can happen when the subject blends into the background or when parts of the subject (like outstretched arms or accessories) are thin and close in color to the background. Try using an image with better contrast between the subject and background, or adjust the original photo’s brightness and contrast before uploading.
Can I replace the background with a specific color instead of making it transparent?
Yes — use the transparent PNG from the Remove Background tool and then upload it to RGBKit’s Change Background Color tool to apply any solid color. Or use the White Background tool for a one-click white backdrop.
Do I need Photoshop to remove backgrounds?
No. AI-powered tools like RGBKit’s background remover deliver results comparable to manual Photoshop selection for most images — in seconds, for free, with no software to install.
Is my image stored on a server?
Your images are uploaded to the server only for processing and are automatically deleted within a few seconds after the task is complete. No images are retained or stored permanently — once you download your result, the file is gone from the server entirely.
Related Tools
Background removal is often one step in a larger image editing workflow. These tools cover what comes before and after.
-
Change Background Color — replace the transparent background with any solid color
-
White Background — one-click white backdrop for product photos and listings
-
Blur Background — soften the background instead of removing it entirely
-
Passport Photo Maker — create compliant ID and passport photos with correct background
-
Crop Image — trim excess space after background removal
-
Resize Image — scale the cutout to your target dimensions
-
Watermark Image — protect your edited images with a logo or text overlay
Final Thoughts
Background removal used to be one of the most time-consuming tasks in image editing. Tracing edges by hand, refining selections pixel by pixel, masking hair strand by strand — it was skilled work that took real time and real expertise.
AI has reduced that to a single upload and a few seconds of processing. The results aren’t just faster — for the vast majority of images, they’re as good as or better than what most people could achieve manually. And they’re available to everyone, not just those with Photoshop licenses and design training.
RGBKit’s Remove Background tool strips the background from any image — person, product, animal, object — and delivers a clean transparent PNG ready for whatever you need it for. No software, no account, no cost.
Upload an image. Get a clean cutout. Put it anywhere.
Explore more free image tools: Change Background Color | Blur Background | Crop Image | Watermark Image | Resize Image