You took photos of a whiteboard after a brainstorming session. You have 14 receipt images that need to go into a single expense report. A client texted you photos of a signed document and you need them in a shareable format. Your kid’s school wants vaccination records uploaded as a PDF, but all you have are phone photos.
In every one of these situations, you need the same thing: images turned into a PDF.
It sounds like it should be simple. And yet, when you actually try to do it, nothing is obvious. Your phone doesn’t have a “save as PDF” button for photos. Your computer’s image viewer can open JPEGs but can’t export them as PDFs. You could print each image to PDF one at a time — but then you’d have 14 separate files instead of one clean document.
RGBKit’s Image to PDF tool takes one or more images in any common format — JPG, PNG, WEBP, GIF, BMP, TIFF — and combines them into a single, polished PDF document. Free, browser-based, works on any device, no software to install, no account to create.
This guide covers how to convert images to PDF, how to handle common scenarios, and how to get the cleanest possible output regardless of which device you’re using.
Why Convert Images to PDF?
People don’t convert images to PDF because they enjoy file format gymnastics. They do it because the real world demands it. Here are the situations that drive the conversion.
Professional presentation
A folder of loose JPEG files feels sloppy. A single PDF document feels professional. When you’re sending whiteboard notes to a team, sharing design mockups with a client, or submitting property photos to a listing service, a PDF communicates that the content is organized, intentional, and complete — not just a random collection of image files dumped into an email.
Submission requirements
Government portals, insurance claims, job applications, academic submissions, loan applications, medical records — they almost universally require PDF uploads. They don’t accept JPEGs. They don’t accept PNGs. They want a PDF. If your source material is photographs, you need a conversion step.
Combining multiple images into one file
Emailing 20 separate image files is messy for you and annoying for the recipient. Uploading them one by one to a portal is tedious. Packaging them into a single PDF turns a scattered collection into one organized document where each image becomes a page. Page 1 is the front of the receipt. Page 2 is the back. Page 3 is the bank statement. Everything in order, everything in one file.
Preserving image quality
When you share images through messaging apps, social media, or even some email providers, the images get compressed — often severely. Colors wash out, text in photographs becomes unreadable, and fine details disappear. A PDF preserves images at their original quality. What goes in is what comes out.
Creating printable documents
Images on their own don’t have a standard page size, margins, or orientation. Printing them directly produces unpredictable results — one image might fill the entire page while the next prints as a tiny square in the corner. Converting to PDF standardizes the layout, giving you consistent, print-ready pages.
Archiving and record-keeping
Photos of receipts, contracts, identification documents, handwritten notes, and medical records are easier to organize, search, and store when they’re consolidated into labeled PDF files rather than scattered across a camera roll with filenames like IMG_4739.jpg.
How to Convert Images to PDF — Step by Step
-
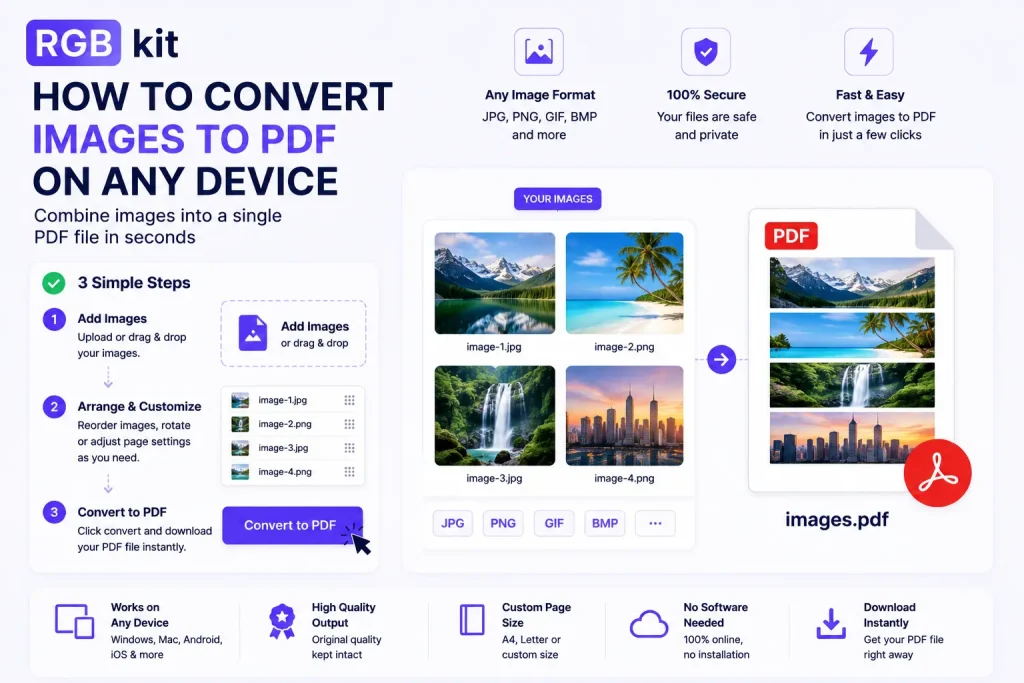
Upload your images — drag and drop files, or click to browse your device. Select one image or multiple at once
-
Arrange the order — if you uploaded multiple images, drag them into the sequence you want. Each image becomes a page in the final PDF
-
Download the PDF — click to generate and save your PDF
That’s the entire process. It works identically on a desktop computer, a laptop, a tablet, and a phone — because it runs in your browser, not in an app.
Converting Images to PDF on Every Device
The tool is browser-based, which means it works on every device with a web browser. But each device has its own quirks when it comes to selecting and uploading image files. Here’s how to handle each one.
On a computer (Windows, Mac, Linux)
-
Open your browser and go to RGBKit’s Image to PDF tool
-
Drag images directly from a folder on your desktop into the upload area — or click to open a file picker
-
Select multiple files at once by holding Ctrl (Windows/Linux) or Cmd (Mac) while clicking
-
Arrange, then download
Tip: If your images are scattered across different folders, move them into a single folder first. It’s faster to select them all at once than to upload from multiple locations.
On an iPhone or iPad
-
Open Safari (or any browser) and go to the tool
-
Tap the upload area
-
Choose Photo Library to select images from your camera roll, or Take Photo to capture a new one
-
Select multiple photos by tapping each one
-
Tap Done, arrange the order, and download the PDF
Tip: If the images are in your Files app instead of your Photo Library, choose Browse instead and navigate to the file location.
On an Android phone or tablet
-
Open Chrome (or any browser) and go to the tool
-
Tap the upload area
-
Select images from your gallery, file manager, or camera
-
Choose multiple images by long-pressing the first, then tapping additional ones
-
Confirm the selection, arrange the order, and download
Tip: Android devices save downloads to the Downloads folder by default. You’ll find your PDF there after downloading.
On a Chromebook
-
Open Chrome and go to the tool
-
Click the upload area or drag files from the Files app
-
Select images from local storage, Google Drive, or a connected USB drive
-
Arrange and download
Chromebooks are essentially browser-based computers, so the experience is identical to using a desktop.
Supported Image Formats
The tool accepts all common image formats. You don’t need to convert your images to a specific type before uploading.
|
Format |
Common Use |
Notes |
|---|---|---|
|
JPG / JPEG |
Phone photos, digital camera images, web images |
The most common format. Converts seamlessly |
|
PNG |
Screenshots, graphics, images with transparency |
Transparency is flattened to white in the PDF |
|
WEBP |
Modern web images, images saved from websites |
Fully supported despite being a newer format |
|
GIF |
Simple graphics, icons |
Only the first frame is used for animated GIFs |
|
BMP |
Legacy Windows images, scans from older software |
Larger files but converts without issues |
|
TIFF |
High-quality scans, professional photography |
Common in medical imaging and print workflows |
You can mix formats in a single PDF. Upload a JPG, a PNG, and a TIFF — they’ll all be combined into one document without any compatibility issues.
Real-World Scenarios
Expense reports
You photographed 12 receipts over a business trip — restaurants, hotels, taxis, parking. Each one is a separate JPEG in your camera roll. Convert them all into a single PDF, one receipt per page, and submit to your finance team or expense management system as a single organized file.
Insurance claims
You need to document damage to your car, home, or property. You took 30 photos from different angles. The insurance portal wants a PDF upload, not a ZIP file of images. Convert the photos into a multi-page PDF that walks through the damage systematically — exterior shots first, then close-ups of specific areas.
Real estate listings
Property photos — exterior, kitchen, bedrooms, bathrooms, backyard, aerial drone shots — need to be compiled into a listing package. Converting them to a PDF creates a professional property brochure that’s easy to email, print, and upload to MLS systems.
Student assignments
A professor asks for hand-drawn diagrams, lab notebook pages, or sketches to be submitted as a PDF. You photograph each page with your phone, convert to PDF, and upload to the course portal. Clean, organized, and exactly what was requested.
Medical and legal records
You have paper documents — vaccination records, identification cards, insurance cards, court orders, notarized letters — that need to be digitized. Photograph each page, convert to PDF, and you have a permanent digital copy that’s accepted by virtually every system that requests documentation.
Creative portfolios
Photographers, illustrators, and designers often need to compile selected works into a single document for client reviews, gallery submissions, or job applications. Converting a curated selection of images into a PDF creates a portfolio that’s easy to share, displays in a consistent format, and doesn’t require the recipient to have any special software.
Meeting and workshop notes
Whiteboard photos, flip chart images, and handwritten notes from brainstorming sessions are valuable — but only if they’re organized and accessible. Converting them to a PDF immediately after the meeting preserves the content and makes it easy to distribute to everyone who attended.
Construction and project documentation
Site photos documenting construction progress, safety inspections, equipment conditions, or completed work need to be compiled into reports. Converting daily photo sets into dated PDF files creates a clear, chronological record.
Combining Multiple Images Into One PDF
The most common use case isn’t converting a single image — it’s combining several into one document. Here’s how to get the best results when working with multiple images.
Getting the order right
The order you upload images is the order they’ll appear in the PDF. But if you need to change the sequence after uploading, drag and drop them into the correct order before generating the PDF. This saves you from having to re-upload everything.
Consistent orientation
If some images are landscape and others are portrait, the PDF will accommodate both — each page matches its image’s orientation. This is usually what you want. But if you need uniform orientation (all portrait, for example), rotate the images before uploading. You can also use RGBKit’s Rotate PDF tool after conversion to fix any pages that came out sideways.
Naming your file
After downloading, rename the PDF descriptively — expense-report-march-2026.pdf is more useful than images.pdf. Good file names make documents findable months or years later.
Tips for the Best Image-to-PDF Results
-
Use the highest resolution source images. The PDF preserves whatever quality you give it. A blurry, low-resolution phone photo will produce a blurry page. If you’re photographing documents, hold the camera steady, ensure good lighting, and fill the frame with the document.
-
Crop before converting. If your receipt photos include the restaurant table, your fingers, and half a coffee cup, crop them down to just the receipt before uploading. The PDF will look much cleaner.
-
Straighten skewed images. A document photographed at an angle produces a skewed page in the PDF. Most phone camera apps and photo editors have a rotation or perspective correction tool. Use it before converting.
-
Photograph documents flat. Lay documents flat on a contrasting surface (white paper on a dark desk, or vice versa). Avoid holding documents in the air — this causes curling, shadows, and uneven lighting that degrade the result.
-
Use consistent lighting. Harsh shadows, uneven lighting, and flash glare all show up in the PDF. Natural, diffused light produces the best results. If you’re photographing multiple pages, keep the lighting consistent across all shots.
-
Sort images before uploading. Rather than rearranging a dozen images inside the tool, sort them in your phone’s gallery or a computer folder first. Upload them in the correct order and skip the reorganization step.
-
Consider OCR after conversion. If you’re converting photos of text documents (receipts, contracts, handwritten notes), the resulting PDF contains images — you can’t search or select the text. Run OCR on the PDF afterward to add a searchable text layer.
Image to PDF vs. Other Approaches
Image to PDF vs. Printing to PDF
Most computers let you “print” an image to PDF using a virtual printer. This works for a single image but has limitations: you get minimal control over page sizing, you can’t easily combine multiple images, and the output quality depends on your print settings. A dedicated Image to PDF tool gives you more control and handles multi-image conversion in one step.
Image to PDF vs. Scanning apps
Phone scanning apps (like Apple’s built-in scanner or third-party apps) are excellent for capturing documents because they automatically detect edges, correct perspective, and enhance contrast. But they typically save each scan as a separate file. If you’ve already captured your images and just need them in a PDF, the Image to PDF tool is faster than re-scanning everything through an app.
Image to PDF vs. Word/PowerPoint export
Some people insert images into a Word document or PowerPoint presentation and then export to PDF. This works but it’s roundabout — you’re using a complex application as a container for what should be a simple conversion. It also introduces potential layout issues: images may resize, margins may not match, and page breaks may fall in unexpected places.
Image to PDF vs. Merge PDF
If your images are already individual PDFs (one per page), you don’t need Image to PDF — you need Merge PDF to combine them into a single file. Use Image to PDF when your source files are actual images (JPG, PNG, etc.). Use Merge when they’re already PDFs.
Frequently Asked Questions
How do I convert an image to PDF for free?
Go to RGBKit’s Image to PDF tool, upload your image (or multiple images), and download the PDF. Free, no signup, no software.
Can I combine multiple images into one PDF?
Yes. Upload all the images you want to include, arrange them in the order you prefer, and download a single PDF where each image becomes a page.
What image formats are supported?
JPG, JPEG, PNG, WEBP, GIF, BMP, and TIFF. You can mix different formats in a single PDF.
Will converting to PDF reduce image quality?
No. The images are embedded in the PDF at their original resolution. What you upload is what you get in the output.
Can I convert images to PDF on my iPhone?
Yes. Open the tool in Safari or any browser on your iPhone, tap to upload photos from your camera roll, and download the PDF.
Can I convert images to PDF on Android?
Yes. Open the tool in Chrome or any browser, select images from your gallery, and download the PDF.
How many images can I include in one PDF?
There’s no hard limit on the number of images. Practical limits depend on individual image sizes — more images means a larger PDF file.
Can I rearrange images after uploading?
Yes. Drag and drop the images into your preferred order before generating the PDF.
Can I add text or annotations to the images?
The Image to PDF tool creates the PDF from your images as-is. If you need to add text, highlights, or annotations, convert to PDF first, then open it in RGBKit’s Edit PDF tool to make your additions.
What if my images are photos of text documents?
The PDF will contain images of those documents — you can view and print them, but you can’t search or select the text. To make the text searchable, run OCR on the PDF after conversion.
Can I convert a single image to PDF?
Yes. The tool works with one image or many. Upload a single image and download a one-page PDF.
How do I make the PDF file smaller after conversion?
If the resulting PDF is too large (common with many high-resolution photos), use RGBKit’s Compress PDF tool to reduce the file size without visible quality loss.
After Conversion: What You Can Do with Your PDF
Once your images are in a PDF, the full suite of PDF tools becomes available.
-
Compress PDF — reduce the file size for emailing or uploading
-
Edit PDF — add text, highlights, shapes, or signatures on top of your images
-
OCR PDF — make photographed text searchable and selectable
-
Add Page Numbers — number each page for easy reference
-
Watermark PDF — add “DRAFT,” “CONFIDENTIAL,” or a logo across every page
-
Rotate PDF — fix any pages that ended up sideways or upside down
-
Rearrange Pages — reorder pages after the fact if you got the sequence wrong
-
Lock PDF — add password protection to sensitive documents
Final Thoughts
Images are everywhere. PDFs are what the world expects. The gap between the two — a folder full of JPEGs that need to become a single, organized, professional document — is one of the most common file tasks people face, and one of the least obvious to solve.
RGBKit’s Image to PDF tool closes that gap. Upload your images from any device — phone, tablet, laptop, desktop — arrange them in order, and download a clean PDF. No app to install. No account to create. No quality to lose.
The receipts, the whiteboard photos, the signed documents, the property shots, the portfolio pieces — they all belong in a PDF. Now they can be.
Explore more free tools: Compress PDF | Edit PDF | OCR PDF | Merge PDF | Rotate PDF