Applying for a passport is a straightforward process, but many applications get delayed because of something as simple as an incorrect photograph. Despite following what may seem like basic instructions, thousands of applicants face rejections every year due to passport photo errors. Understanding the official passport photo regulations can help you avoid unnecessary delays, extra expenses, and repeated submissions.
In this guide, we will explore the most common reasons passport photos are rejected, explain why passport photo gets rejected, and provide practical solutions to ensure your image meets all passport photo requirements the first time.
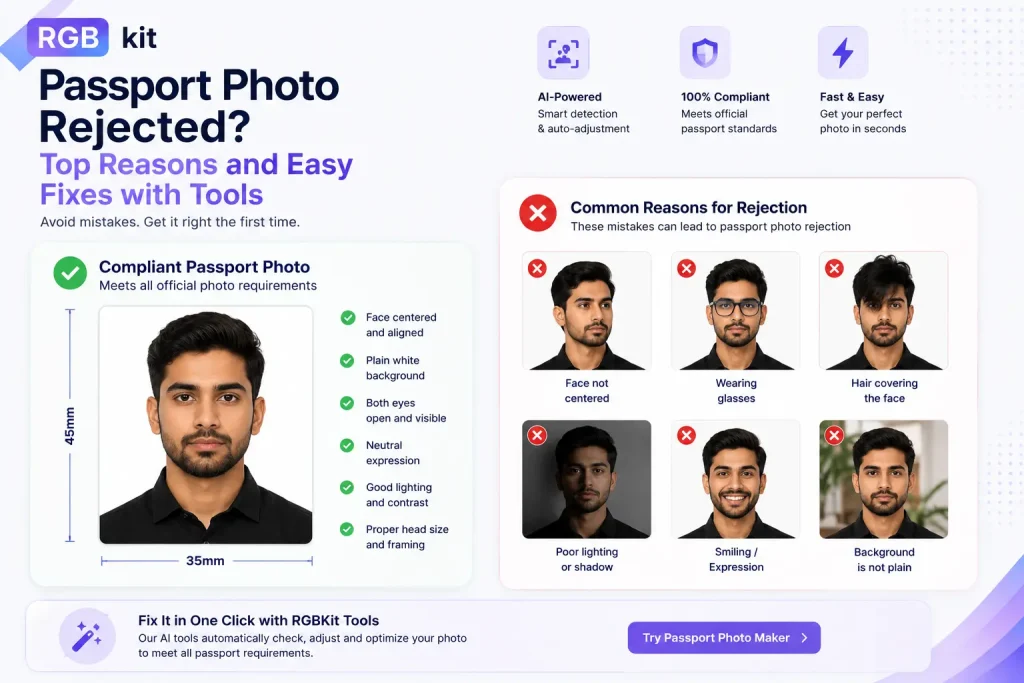
Why Passport Photos Get Rejected
Government authorities follow strict passport photo specifications to ensure consistency, identity verification, and compatibility with biometric systems. Even a minor mistake can result in your application being flagged or rejected.
Most rejections occur because applicants fail to comply with passport picture rules regarding background, lighting, facial expression, image quality, or sizing. Fortunately, these mistakes are easy to avoid once you understand the official passport photo requirements.
Let’s look at the most common passport photo mistakes and how to fix them.
- Incorrect Background
One of the most frequent passport photo background errors involves using a background that does not meet official standards.
Common Mistakes:
- Colored backgrounds
- Patterned walls
- Visible objects behind the subject
- Textured surfaces
- Shadows on the background
Most passport photo regulations require a plain white, off-white, or light-colored background free from distractions and shadows. Background issues are among the leading causes of photo rejection worldwide.
How to Fix It:
- Stand against a plain white or light-colored wall.
- Ensure no furniture, decorations, or objects appear in the frame.
- Position yourself slightly away from the wall to prevent shadows.
- Use proper lighting to create an evenly lit background.
- Poor Lighting and Shadows
Passport photo lighting issues are another major reason applications get delayed.
Common Mistakes:
- Harsh shadows on the face
- Overexposed images
- Underexposed images
- Uneven lighting
- Glare from glasses
Official passport photo conditions require your face to be evenly illuminated with natural-looking skin tones and no shadows across facial features.
How to Fix It:
- Use soft, even lighting from both sides.
- Face a window for natural daylight when possible.
- Avoid direct flash photography.
- Check that no shadows appear behind your head or on your face.
- Remove reflective glasses if possible.
- Incorrect Facial Expression
Many people are surprised to learn that smiling too much can result in rejection.
Common Mistakes:
- Broad smiles
- Open mouth
- Raised eyebrows
- Looking away from the camera
- Tilting the head
Most passport photo requirements specify a neutral facial expression with both eyes open and mouth closed. Facial recognition systems work best when images follow standardized guidelines.
How to Fix It:
- Look directly into the camera.
- Keep your mouth closed.
- Maintain a neutral expression.
- Keep your head straight and centered.
- Blurry or Low-Quality Images
Image quality plays a critical role in meeting passport photo qualifications.
Common Mistakes:
- Blurry photos
- Pixelated images
- Grainy photographs
- Poor resolution
- Camera movement during capture
Government agencies require clear, sharp images that accurately represent your facial features. Blurred or low-quality photos are among the most common reasons passport photos are rejected.
How to Fix It:
- Use a high-resolution camera.
- Ensure the camera is properly focused.
- Keep the camera steady.
- Review the image before submission.
- Avoid screenshots or compressed images.
- Wrong Photo Size or Cropping
Incorrect dimensions frequently lead to rejection, especially for online applications.
Common Mistakes:
- Face appearing too large
- Face appearing too small
- Improper cropping
- Incorrect image dimensions
Every country has specific passport photo specifications regarding image size, head size, and positioning. Even if the photo looks good, improper proportions can trigger an automatic rejection.
How to Fix It:
- Follow the exact sizing requirements for your country.
- Ensure your face occupies the recommended portion of the frame.
- Center your head properly.
- Use professional passport photo tools to verify dimensions.
- Wearing Glasses Incorrectly
Although some countries allow glasses under specific conditions, eyewear remains a common rejection factor.
Common Mistakes:
- Reflections on lenses
- Tinted glasses
- Frames covering the eyes
- Glare obscuring facial features
Passport photo guidelines generally require that eyes remain fully visible without reflections or obstructions.
How to Fix It:
- Remove glasses whenever possible.
- If glasses are medically necessary, ensure there is no glare.
- Keep frames away from your eyes.
- Avoid tinted lenses.
- Hair Covering Facial Features
Your face must be clearly visible for identification purposes.
Common Mistakes:
- Hair covering the eyes
- Hair obscuring facial contours
- Excessive shadows from hairstyles
Authorities need a clear view of your facial features to satisfy passport photo qualifications.
How to Fix It:
- Pull hair away from your eyes.
- Ensure both eyes remain fully visible.
- Avoid hairstyles that create shadows across the face.
- Digital Editing and Filters
Modern smartphones make photo editing easy, but edited passport photos are often rejected.
Common Mistakes:
- Beauty filters
- Skin smoothing
- Background replacement
- AI enhancements
- Retouching facial features
Official passport photo regulations require an authentic and unaltered representation of your appearance. Digitally manipulated photos can lead to immediate rejection.
How to Fix It:
- Submit the original image.
- Avoid filters and editing apps.
- Do not retouch blemishes or skin tone.
- Keep the photograph completely natural.
- Headwear and Accessories
Certain accessories can interfere with facial recognition systems.
Common Mistakes:
- Hats
- Fashion head coverings
- Large accessories
- Face-obscuring jewelry
Most passport picture rules prohibit anything that hides facial features unless worn for documented religious or medical reasons.
How to Fix It:
- Remove hats and fashion accessories.
- Ensure your entire face is visible.
- If wearing religious headwear, make sure facial features remain unobstructed.
Although these are generic mistakes that can get your passport picture rejected, it is also suggested to understand the passport picture rules and dimensions accepted in different countries such as the US, the UK and India.
Final Checklist Before Submitting Your Passport Photo
Before uploading or printing your photo, confirm that it meets all passport photo conditions:
✔ Plain, light-colored background
✔ Even lighting with no shadows
✔ Neutral facial expression
✔ Eyes fully visible
✔ Correct dimensions and cropping
✔ Sharp, high-resolution image
✔ No digital editing
✔ Face fully visible
✔ Compliant with official passport photo specifications
Taking a few extra minutes to review these details can save weeks of processing delays.
Conclusion
Understanding common passport photo mistakes is the easiest way to ensure your application is accepted without delays. Whether you are applying for a new passport or renewing an existing one, following official passport photo regulations, passport photo guidelines, and passport photo requirements will significantly reduce the risk of rejection.
At RGB Kit, we help users create compliant passport photos with our tool that meet international standards and passport photo qualifications. The tool automatically checks key compliance factors such as photo size, background, head positioning, facial visibility, and overall image quality against official passport photo requirements. It can also help identify and correct common mistakes before submission, reducing the chances of rejection and giving you greater confidence that your passport application will be processed smoothly.
By using a reliable passport photo verification tool and following the recommended guidelines, you can ensure your photo meets the required standards the first time and avoid the hassle of resubmitting your application.
Frequently Asked Questions (FAQs)
Why passport photo gets rejected?
Passport photos are typically rejected due to incorrect backgrounds, poor lighting, improper facial expressions, wrong dimensions, digital editing, or failure to meet official passport photo requirements.
What are the most common passport photo mistakes?
The most common passport photo mistakes include shadows, blurry images, smiling, incorrect sizing, background distractions, and edited photographs.
What are common passport photo background errors?
Using colored, textured, patterned, or shadow-filled backgrounds are among the most common passport photo background errors.
How do passport photo lighting issues affect approval?
Uneven lighting, harsh shadows, overexposure, or underexposure can obscure facial features and violate passport photo guidelines.
What are the common reasons passport photos are rejected?
Common reasons passport photos are rejected include incorrect background, poor image quality, wrong dimensions, facial obstructions, digital alterations, and failure to follow passport photo specifications.